

Click for FREE Access To The 14 Day Blog Income Challenge!
Building your email list is one of the most important things you need to be doing as a blogger – whether you’ve been blogging for 1 day, or 1 year. Building an email list gives you an instant-audience that you can reach out to, every time you have new content to share or new opportunities/products to share with them. There is a small monthly cost involved, but its one of the best investments into your business that you can make, because you are investing into growing a connection with your fanbase – one that you can leverage down the road for future growth and income opportunities.
Trust me – waiting to set this up is one of my biggest regrets in my business.
- Read this article
- Come back here and follow the steps below to set up an email capture system that will give you the rights to actually email your audience.
You can assume any links within this post are affiliate links.**

PIN FOR LATER
1. Sign up for an account at Get Response
My preference for Email Marketing providers is Get Response due to their ease of use – this tutorial will show you the steps within Get Response (although most major EMS providers offer similar options). Choose the most basic plan to start, as your list grows you will automatically be bumped up. (I’d recommend against the trial because you don’t get access to the autoresponder feature which is an important part of what you’ll be setting up today).
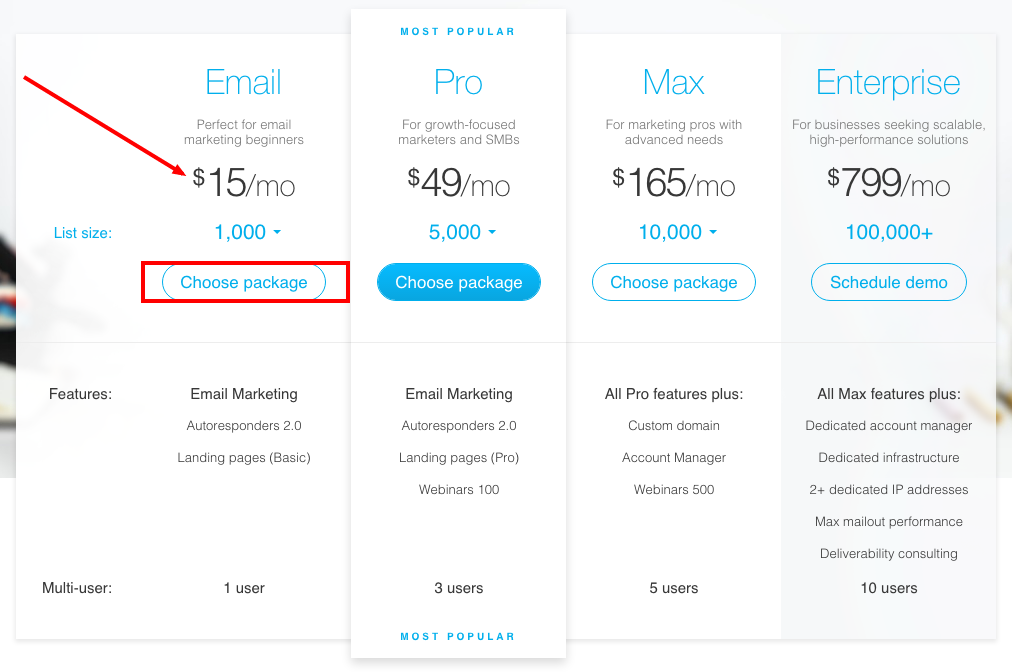
Fill out the account information and billing information on the next page, and create your account.
2. Create a valuable FREE offer for your readers
In order to entice people to give you their email address, you need to offer something that is a bit “above and beyond” your typical blog posts. Starting out, many people will create their opt in offer as a “Newsletter Sign Up” where they will send out notifications of their blog posts. This is not super compelling and isn’t the best use of your opt in. Find out something that your audience truly wants, put that together as a PDF and offer that to your audience. It could be a list of your best posts, a checklist, a cheatsheet, or something else. Make sure to keep it simple – it doesn’t need to be a 700 page ebook to be compelling.
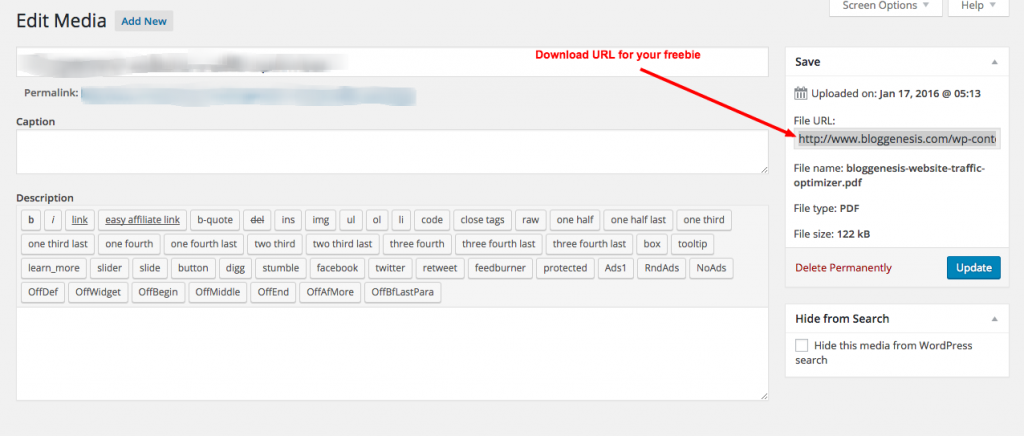
Once you have it created, save it as a PDF and upload it into your WordPress Media folder. Copy the link to that download – we’ll come back to it shortly.
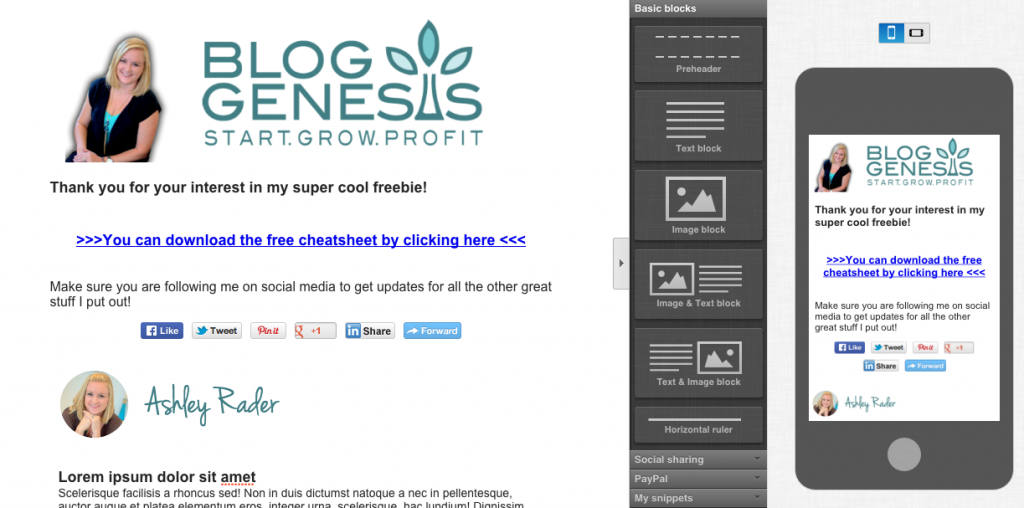
3. Create a Form To Collect Emails
Once you are logged into Get Response, click to Forms > Create Form and choose the Blank form.
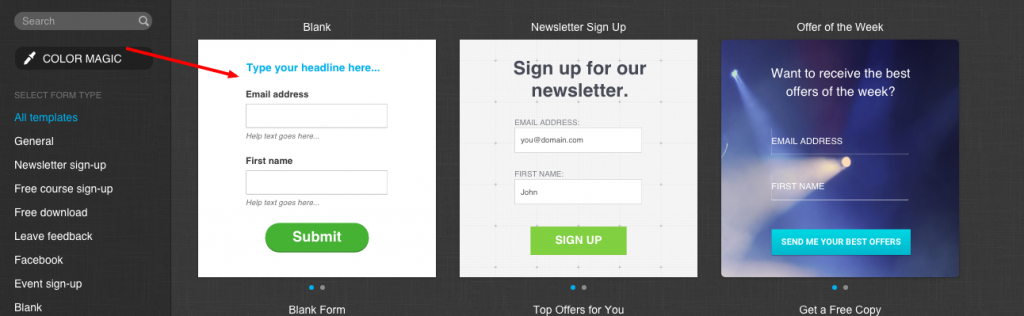
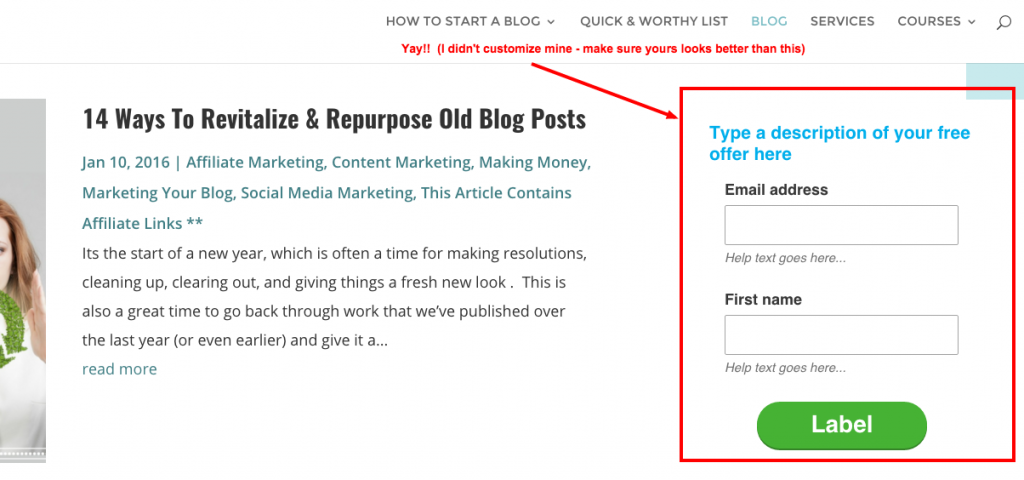
4. Create a Form To Collect Emails
Once you are logged into Get Response, click to Forms > Create Form and choose the Blank form. Once you arrive at the form editor – edit the headline to include a call to action and description of your free offer. You can change the display and color of the text as you wish, as well as add additional fields (I recommend for people to keep it simple and just use Email or Name/Email only).

Click Save & Publish. On the following page, click the “COPY” button next to the line of Javascript Code, which will copy the code to your clipboard.
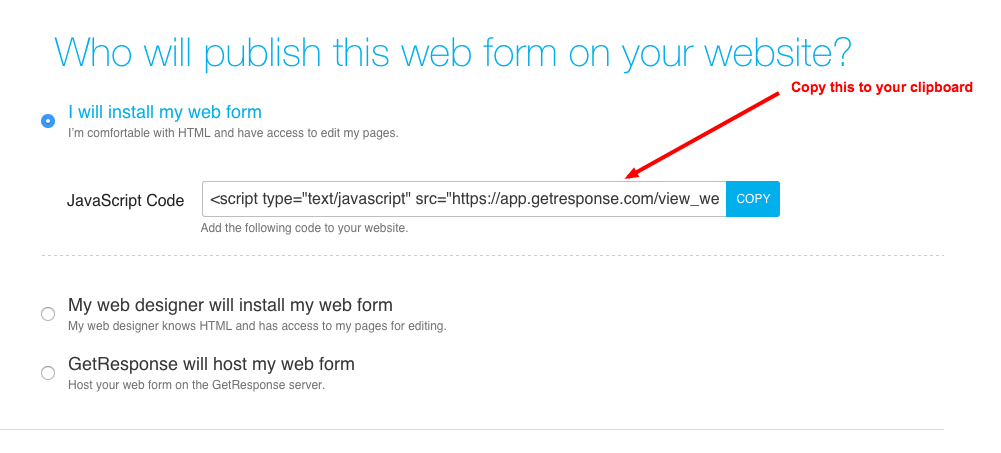
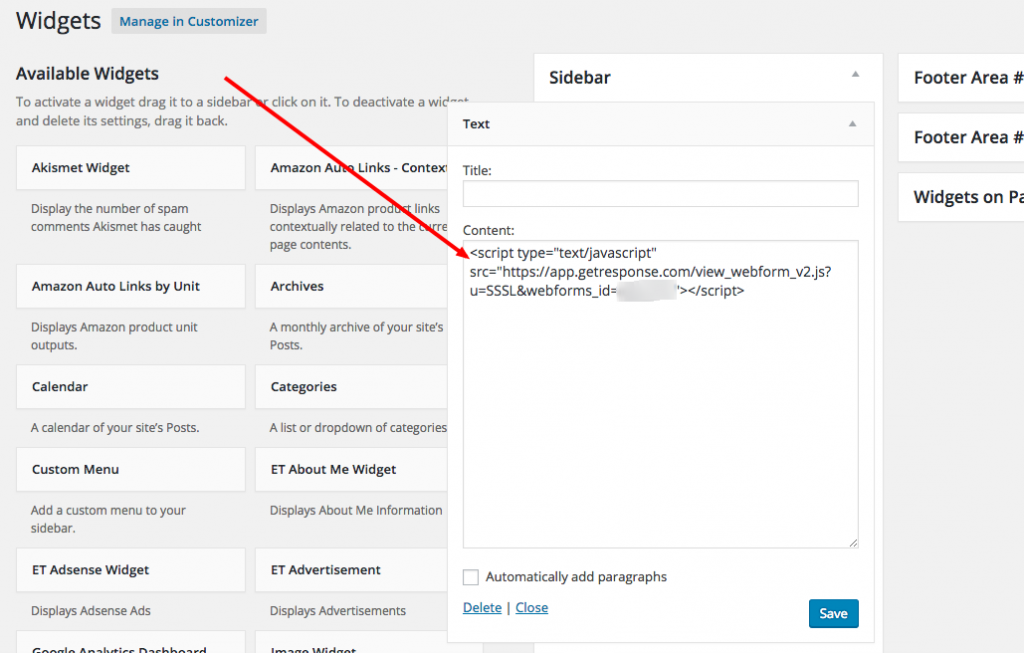
5 . Install Your Webform On Your WordPress Website
Head over to WordPress and click Appearance > Widgets. Choose a location on your site where you’d like the optin form to appear – typically at the top of your sidebar, or in your footer section (I’d recommend the top of your sidebar). Drag and drop a text widget to that location – open it and paste in the javascript code (leave the title area blank).
Click Save!
6. Refresh your website and check out your brand new optin form!
7. Add Your Optin Freebie to Your Autoresponder List
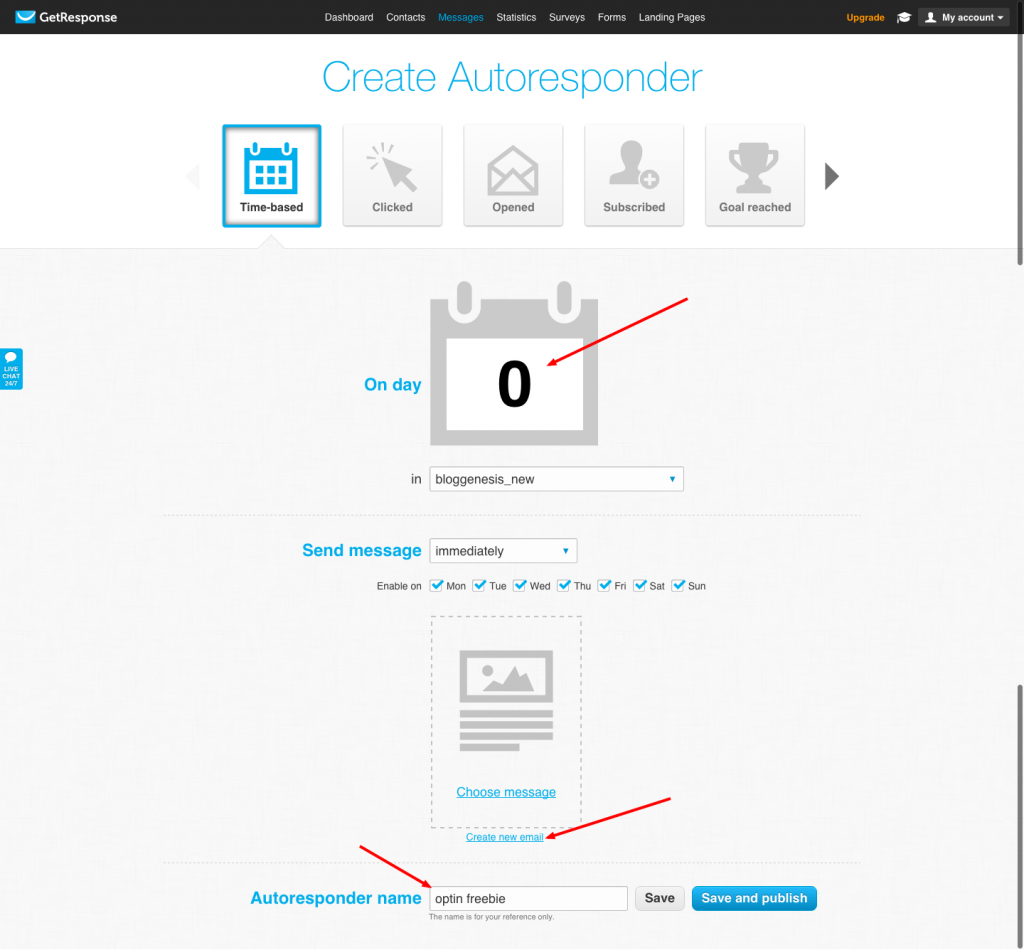
Head back over to Get Response and click Messages > Create Autoresponder.
We’re going to set up a time based email that will send out immediately when someone signs up for your list.
So the time based field will be On Day: ‘0’.
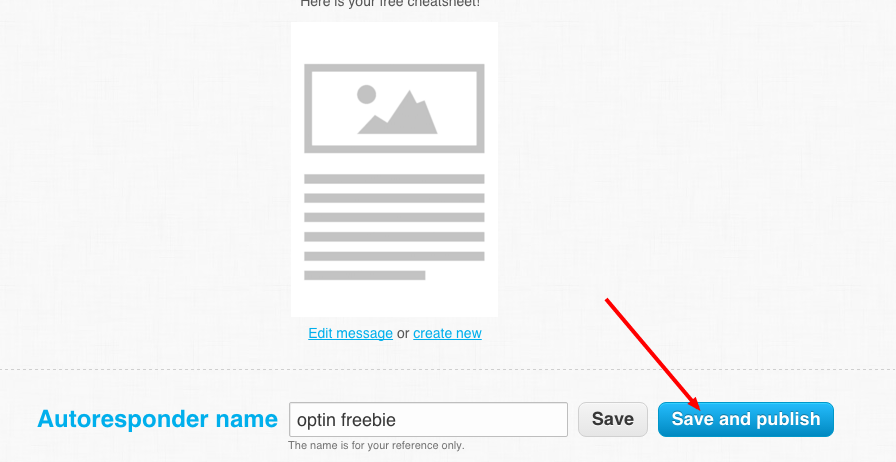
Give your email a name (for your reference) such as ‘optin freebie’ and click “Create Email”.
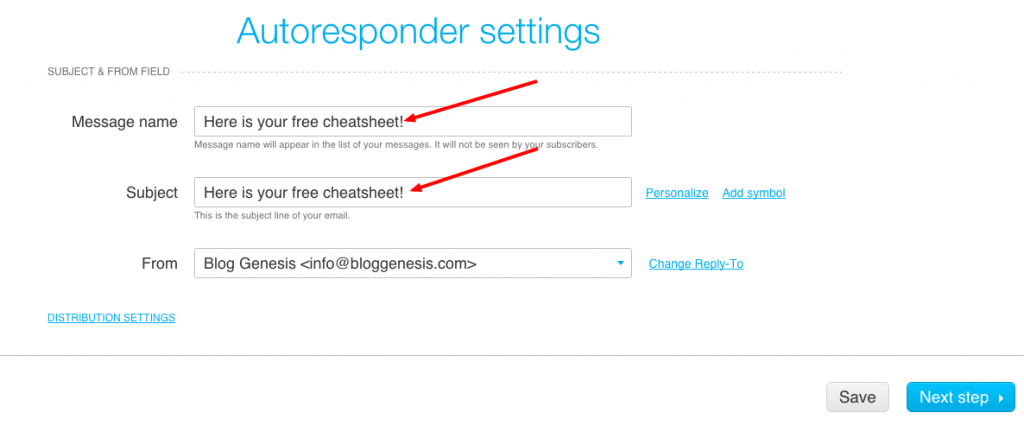
Give your email a subject line that references what they signed up for. “Here is your free cheatsheet!”
Choose a template that you like (or opt to “Start From Scratch” which is what I usually do) and click Continue.
Use the drag and drop editor to add some text and imagery to the email that is going to deliver the freebie. Somewhere within the text you’ll want to create a link to your freebie – the PDF that you uploaded into your media folder. Make sure you highlight this as it’s the main reason they subscribed to your email.
Click “Next Step” and then the big blue “Save and Publish” button.
Thats it – Congratulations!!!
You now have a system that will capture emails, grow your list, and deliver a high value report to your subscribers.
Next Steps…
Now that you have the basic email system set up, there are some ways that you can take things to the next level – to grow your list faster, to capture your reader’s attention more clearly, and to increase your engagement with your list.
If you’re looking to rapidly grow your list, check out my Email Marketing 101 Workshop. It will teach you how to create an irresistible opt-in offer, how to set up highly converting email opt-in boxes, and how to structure an email follow up series that will hook your followers in and turn them into your biggest fans.
Here are the products that I use highly recommend for creating amazing opt in boxes that will help you grow your list quickly (all the optin forms on my site are created with these two programs).
- Pop up Optins with Exit Intent: OptinMonster
- Landing Pages & Squeeze pages: Optimizepress2.0
i love how you write your blogs kudos!!!!