

Click for FREE Access To The 14 Day Blog Income Challenge!
How To Start A Blog
So you’d like to start a blog?
If you’re like SO many whom I’ve worked with before – you probably have considered starting one for a long time, but just felt overwhelmed by the idea of it.
Maybe you aren’t super “techy” and figured it would be way over your head.
Or maybe you were nervous about putting yourself “out there” for the world like that.
Whatever the reason – I’m here to help you get through the techy stuff (its much easier than you think) and to tell you that you won’t regret it. If you commit and jump in with both feet, it could very well be the ride and success story of your life.
Whether you’re looking to start a blog so that you can build an income from home, market an existing business, get exposure for your services or to simply share your thoughts with the world – having a blog is essential to the overall marketing plan of any business in our modern world.
Let’s Get Started – Click each box below to read the in depth details!
(PS… if you want to watch these lessons via a bit more in depth video walk through – get in FREE with my Quickstart Blogging Bootcamp)
Step 1: Choosing your niche/topic
So lets do some introspection…
What is your passion in life?
What do you love to talk about, or tell people about, or just generally spend your time doing?
Do you read blogs and think to yourself “I could totally do this… if only I knew how to get a website up and going”…
Well today is your day my friend, Carpe Diem!
I’ll show you how easy the website stuff can be, so you can show YOUR love for _{insert whatever you are passionate about)__ with the world!
And it doesn’t matter what the topic is – if people can make money (and in some cases a LOT of money) writing about things like bad cake pictures, you can make money blogging about whatever it is you love!
Blogs are a super easy way to share your interests & talents, and connect with other people who share the same passions.
And believe it or not, blogs can actually make money as well… you might be one of the hundreds of thousands online, whose hobby turns into a full time income!
- Take some time to think about what it is that you love and are passionate about in life. You don’t want to find yourself becoming bored of your niche, 2 months into your new project!
- Make a top 5 or top 10 list of ideas and then run them by friends and family. What topics do they see you as being an “expert” in? What topics do they feel you have a unique gift in understanding and communicating with the world?
- Choose and niche and begin brainstorming blog names, which leads us to step 2…
Step 2. Choosing A Domain Name
Now is the fun part, you get to pick a name for your new blog!
You want to pick something that is relevant to the niche/topic that you chose in step 1, but brandable. By brandable, I mean that it is unique and memorable.
Branding is a huge topic which I cover in a bit more detail here, but there are a few large ways that you can mess this up .
If you want to read about how I royally messed this up a few years ago, you can read my post “I learned the importance of branding when I almost got sued.”
Lets just say – its super important to pick a name that people will remember.
Forget trying to come up with a name that squeezes in all of your keywords (ahem, this is for the SEO folks).
And forget going with anything other than the .com version of your domain name. Unless you are branding your own name (in which case its possible it is taken and you have to go with a different website ending – I like to use .me – do not consider buying a .net or .org version of the name that you come up with.
If someone else is using the .com version of a name that you like already – then you need to keep brainstorming new names until you come up with something that is unique enough to stand by itself.
Adding a qualifier such as “the” at the beginning, or adding dashes between the words is not going to improve the strength of YOUR brand, if you’re adding it to piggy back off of someone else’s brand.
So most importantly – you want your name to be relevant to your niche, and you want people to remember the name – something catchy, something memorable. Make sure it is easy to spell, isn’t too long, and looks ok written down without spaces.
I like to use Godaddy to research domain names because they give suggestions of other similar available names that you could use – if the one that you choose is already registered. To make it easy though, I recommend using them to find whats available and then registering the domain name at your host (will show you how to do that in the next step).
- Head over to Godaddy.com and use their big search field to search any names that you are considering and see whats available – remember to keep them all as a .com.
- Use the box on the left, to type in some ideas and see whats available. Keep a list of all your favorite names that you find are available, and then pick one from your list.
Step 3: Setting Up Your Hosting
Every blog needs to be hosted by a web hosting company (except for the free blogging platforms, but I highly recommend you avoid those if you want to grow your blog into something that can create income, grow a traffic base, and become a business – which all of them have the potential to do).
A webhost is basically a virtual place for your website to live, where you can store all your blog’s “stuff” – which includes images, content, videos, etc. Just like your hard drive on your computer stores all your stuff, similarly, your blog or website needs a spot to store all of the files.
To simplify the process, you can register your website’s domain name (your website address) at the same time that you set up your webhosting account. If you already have a domain name, you can simply choose the “I already have a domain” option when setting up your hosting account.
- Click this link to go to Bluehost to begin setting up your hosting account* – (it will open in a new window so you can keep following these instructions)
- Click the “Get Started!” button on the homepage.
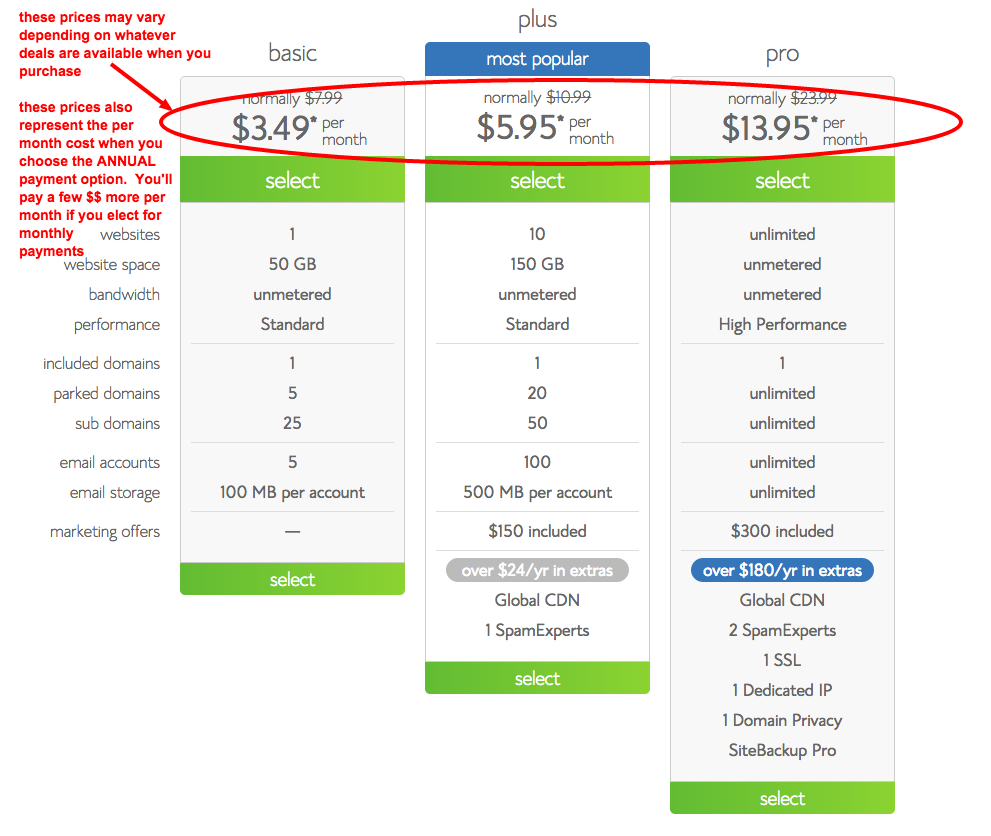
- On the next step, you’ll choose your hosting package. Since you’re just starting off, you can pick the most basic package. If you can afford the annual hosting option – I would do that as it saves a ton in hosting costs. The great thing about BlueHost is that they have very affordable rates, plus you get your domain registered for free.
- On the next page, you’ll enter in the domain name that you’ve chosen to go with in the “new domain” field (based upon your research from step 2 and what you found to be available)


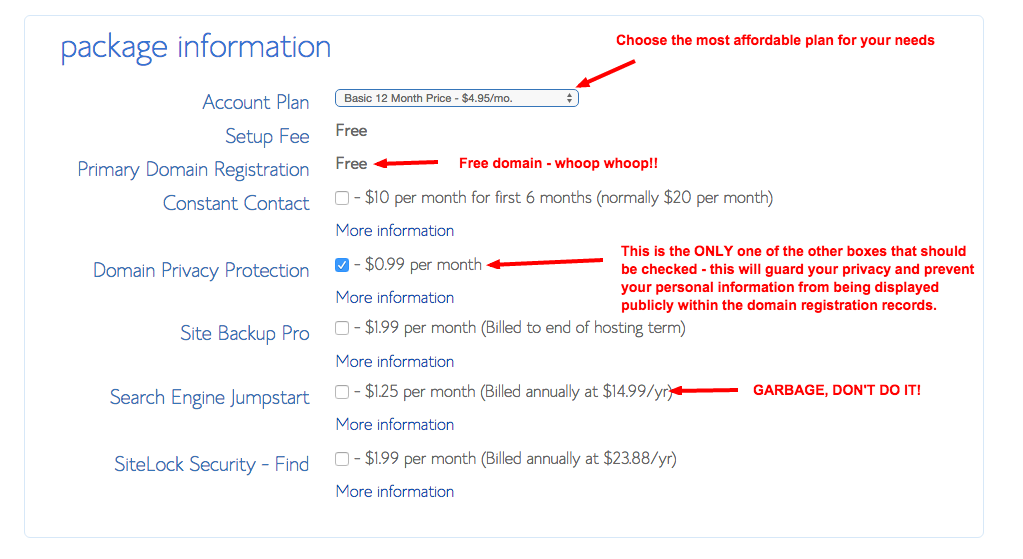
- Next you’ll enter in your billing information, and they will give you the option to select from some additional/optional services. Most of these you will NOT use. In the image below are my recommended settings/options (skip and UNCHECK the services that are x’d out in my image below – you do NOT want those services):
- Enter in your billing information and click submit – thats it!! You’ve registered your domain, and you have a place for your lovely new website to live!
- Now we need to build that site (its super easy, don’t worry!)
Step 4. Install WordPress
Now that your domain name is registered and your hosting is set up, you need to install WordPress.
WordPress is the system that you will use to manage your blog – the posts, pages, links, content, everything.
Its super easy to use, and has a ton of simple to activate features that will make your blog totally rock.
It also installs flawlessly, with just a few clicks no uploading files or techie stuff – now thats my kind of easy!
- Go check your email – there should be a notification from BlueHost providing a link and log in details for you to and log into your new hosting account.
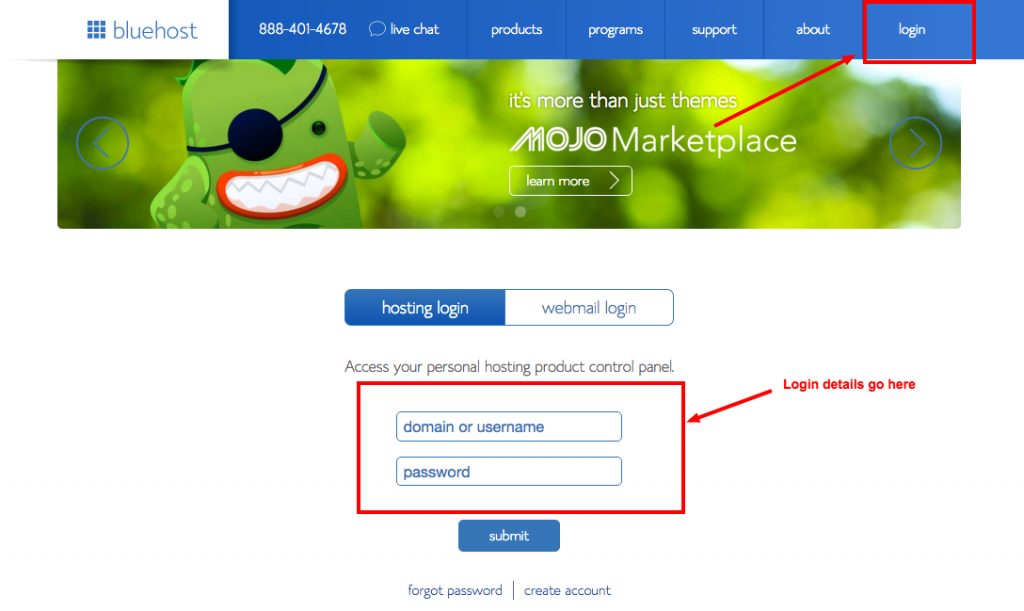
- Go to Bluehost and click “log in” in the upper right hand corner, and log in with those details.
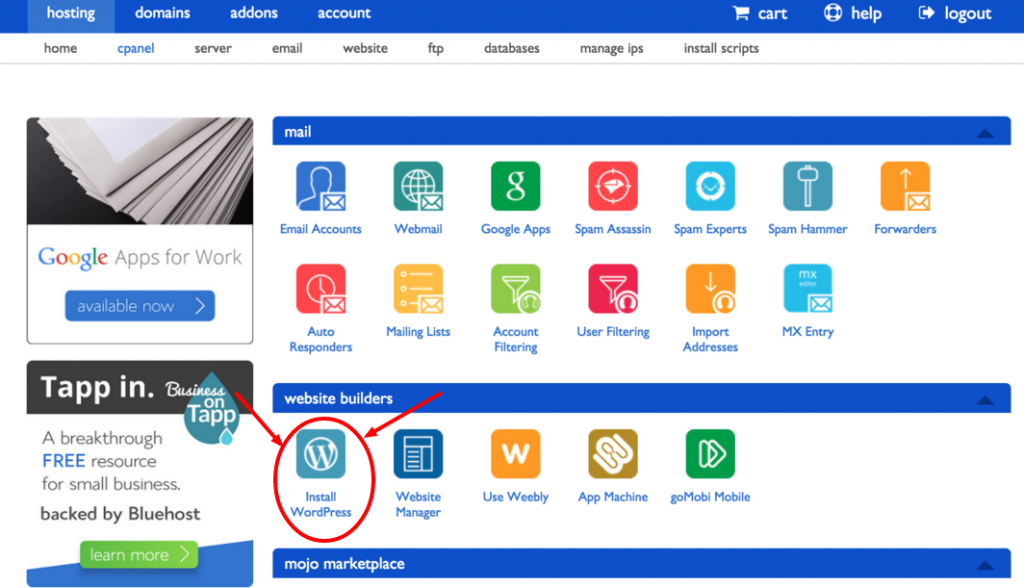
- On the next page, look under the “Website Builders” heading for “Install WordPress” and click that link.
- Click the green “INSTALL” button
Here is a screenshot of what the install settings should look like:

Once that is filled out, click “Complete” and in about 10 seconds, your blog is installed! Make sure you keep track of your log in credentials (the ones you entered in on this step) so you can log into WordPress admin dashboard and set things up.
Thats it, your blog software is installed and you now officially have your own blog!!!
Go have a glass of wine (or whatever your healthy indulgence is), you deserve it. 🙂
So now… your new blog’s admin panel (where you will add posts, pages, content, etc) will be located at http://www.YourDomainName.com/wp-admin
Using the username and password that you set up during the software installation, go ahead and log into the admin panel of WordPress.
Step 4. Customizing WordPress and Publishing Content
Log into WordPress, and take a tour around.
The awesome thing about WordPress, is that its damn near impossible to screw anything up permanently.
If you make a change that you don’t like, you can just simply go back and reverse the change, and your blog is automatically updated.
You can change settings, tweak things, and they are pushed live onto your site immediately – but they can always be changed, or reset.
Before you start publishing your posts, you’ll want to get a “theme” for your blog, to make it look MAHvelous.
A theme is basically the overall look, styling and layout of the site, that your readers will see. The color scheme, the menus, the fonts used, etc.
You can use a free WordPress theme (click here to check some of them out), or if you want to go with a style that is totally customized for the niche you will be blogging about, here are my top 2 recommended premium WordPress Theme providers to give your blog that truly profesh look:
- Elegant Themes* – their themes are beautiful, and are coded very well for excellent user experience. You get 89+ different themes to choose from, for one low price.
- Themify.me* – gorgeous themes – you can buy one at a time, or in their theme club with acesss to 80+ themes
Install your theme, get it set up and then head on over to the “Posts” tab in the left side of WordPress, and start publishing your blog posts!
If you just completed all the steps in the boxes above… then CONGRATULATIONS! You now have your very own blog!
That means that you can share your blog’s URL with family and friends and they’ll be able to view it (keep in mind it can take a few hours for the site to show for EVERYONE if you just recently set up the hosting).
Next Steps…
- Sign up for my FREE weekly Quick & Worthy List – a weekly “To Do” list for action oriented bloggers and online business owners.
- Get to know your blogging platform in a fraction of the time, with my WordPress Rockstar Bootcamp.
If you found this information helpful, please share!
*There are affiliate links included on this page.